Hello, Artenauta! Today we are going to teach you in a step by step how to paint glass in oil. It applies to any object, but in this case, we will take a simple example, with a fairly homogeneous background.
You have to keep in mind that painting transparent objects becomes more complicated as we have other objects behind us, due to the refraction of light.
How to paint glass in oil in 6 steps?
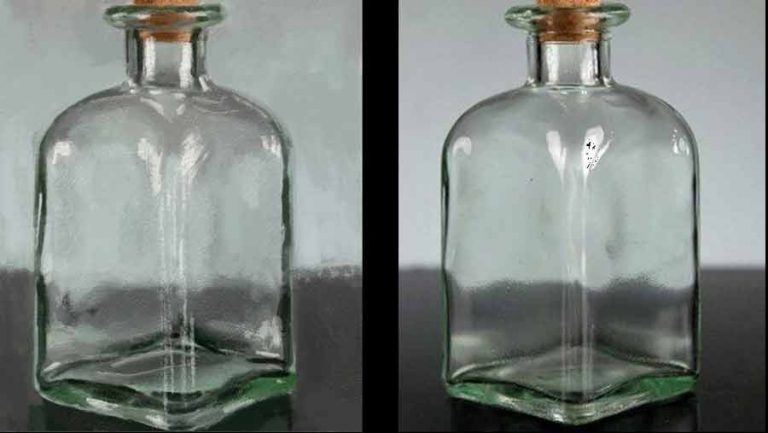
What does what we explained above mean? It means that, when a transparent object comes between our eye and the background, what is behind that object will be deformed according to its own shape and thickness, as is the case of the example we bring you today.
It’s easier to see than to explain: place objects behind a glass or crystal vase and you will see that these objects deform as the surface of the object curves and, depending on your point of view as a viewer, changes position. There are even times when the backgrounds turn around when viewed through the glass!
So this effect is something we will have to take into account when we are going to paint a transparent glass object, especially if we are beginners.
Another aspect to keep in mind is the contours: even if it is transparent, our object has more density at the edges and we must insinuate them… But never with a simple contour line!
If you notice, the edges are appreciated by the light they absorb and reflect, so we will have to work a lot on the contrast between light and dark, and that is why we will need a very well trimmed and generally fluid brushstroke.
It is very likely that our pulse is not very fine and this could seem an impediment, but if we use a tiento or a rod to support our arm, we will be able to tame the brush and make the paint run with great ease, being much more accurate.
Let’s see how we work the glass in a step by step!
Step 1 - Fitting and sealing of the drawing

As always, we start by fitting with charcoal and sealing the line with turpentine so as not to drag the dust when painting. We should be very careful with the curved, straight and symmetrical shapes, because a bad fit will spoil the whole work.
To do this, you can help yourself by looking at your drawing already fitted in a mirror to correct the slopes or curvatures poorly executed. Also, it will be a good idea to mark the areas where we have maximum brightness and maximum darkness to guide us and respect those parts until later stages.
Step 2 - First general gouaches

With the paint very diluted, we will apply color in a very summarized and general way, respecting the maximum brightness and without eliminating completely the guide drawing.
Step 3 - Working the intermediate tones

At this point we will begin to work the intermediate tones, which in our case tend to the greens. We will work on two shades of green, one lighter and the other darker at the edges. In addition, we will take the opportunity to fill in more the general spots with large brushes and add rhythm to the brushstroke of the whole image in general.
Step 4 - Working on dark areas and general filling

In this step, we will continue to blend the layers, switching to medium brushes, with different directions in the brushstroke, and we will start working the darks of the contours, trying not to simply cover what we had worked in green, but combining both layers, making broken and wider or thinner lines as appropriate.
Step 5 - Maximum darkness and brushstroke sharpening

We will move on to smaller brushes and we will go on shading medium reflections and greenish and gray tones in the bottle and orange tones in the cap. Now it is time to add the maximum dark tones in the work, very carefully, refining the edges and retouching the background if necessary.
Step 6 - Maximum brightness and detail.

And finally, we will work the maximum brightness with a slightly broken white, but with great power of clarity. This touch will be the one that will definitely give the quality of polished transparency of the glass to our bottle. A few small textured brushstrokes on the stopper and… done! You have learned how to oil paint glass.
And, as always, Artenauta, we remind you that, in order to progress in our learning in a satisfactory way, it is very important to know in depth the materials we are going to work with and to develop a good base in drawing and in the theory and practice of color and light.
In this way, we will always be motivated to continue learning, improving in each work we do, and, above all, developing our analytical skills and our creativity.
All this and much more we teach you in depth in our Painting and Drawing Course, in which you can enjoy the path to become an artist in an entertaining way and at your own pace.
Join our Artenautas community!